Monday 24 June 2013

Final Submission


Mashup of 3 News Articles

This part of the experiment was conducted in the early stages and I found it to be a really useful exercise because it enabled me to come up with the concept that I have thoroughly relied on when developing my bridge and Architectural Folly.

The submission for this part of the experiment can be found here.

18 Sketch Perspectives

This part of the experiment was also really useful because it enabled me to develop my skills when developing relationships between various objects. I in fact put some of the things that I learned from this exercise into practice when creating the individual zones in the bridge for this experiment.

The submission for this part of the experiment can be found here and here.

36 Custom Textures

This part of the experiment was similar to that of the other previous experiments in this course but I believe that I have rapidly improved in creating custom textures throughout my journey in this subject. I was able to express myself better when creating these custom textures thus creating a broad range of textures which I have used thoroughly on my model.

The submission for this part of the experiment can be found here.

Sketchup Model & Elevators

Throughout this experiment I was really pleased with how far my skills had developed in using CryEngine. We were then introduced to creating a working elevator using CryEngine which I applied to a draft model earlier in this experiment.

The submission for this part of the experiment can be found here.

Draft CryEngine Environments

Throughout this experiment I made sure that I detailed my environment as I progressed throughout this project. I was able to replicate a valley that is found in my country of origin inside of CryEngine and detailed it to suit my bridge.

The submission for this part of the experiment can be found here and here.

The Image Captures & Architecture

I was really pleased with the end result of my bridge because I was able to implement my concept on the design of each individual zone and in return developing zones that unite in characteristics and aesthetics yet are actually practical. Sustainability for me personally is a serious concern in this modern world and I strongly believe that a clever designer must find a potential way to implement a portion of sustainability in their design solutions.

"Implementing sustainability in a design is what separates the common from those with a creative mind."

The design of my bridge is based on 4 main zones that lead onto the central zone (Architectural Folly) via glass tunnels that allow for the full experience of the surrounding environment. My main reason behind creating a central zone which is the folly is because I wanted to create a space that would allow the students and staff to interact when moving from one zone to another which can be simply compared to a school hallway or play ground which are the social spaces that allow for interactions.

The design process of the Library zone can be found here.
The design process of the Lecture Theatre zone can be found here.
The design process of the Students zone can be found here.
The design process of the Staff zone can be found here.

The Architectural Folly itself was rather an interesting one. I wanted to create an experience rather than a structure which helped serve for the same definition of a folly. I took the central zone of my bridge which is a large area that can easily accommodate the full number of students and staff and built a pod in it which then acts as a large elevator. The folly travels vertically down and stops below the water level of the valley to which then the meeting can be carried out between myself (the dean) and the students. I ensured that the pod had a strong glass structure to also allow for an amazing experience beneath the water level of the surroundings yet having structural adequacy to resist the water pressure.

A variety of captures of my final bridge have been condensed into a short movie which can be viewed below.

A bird's eye view of the bridge and environment.

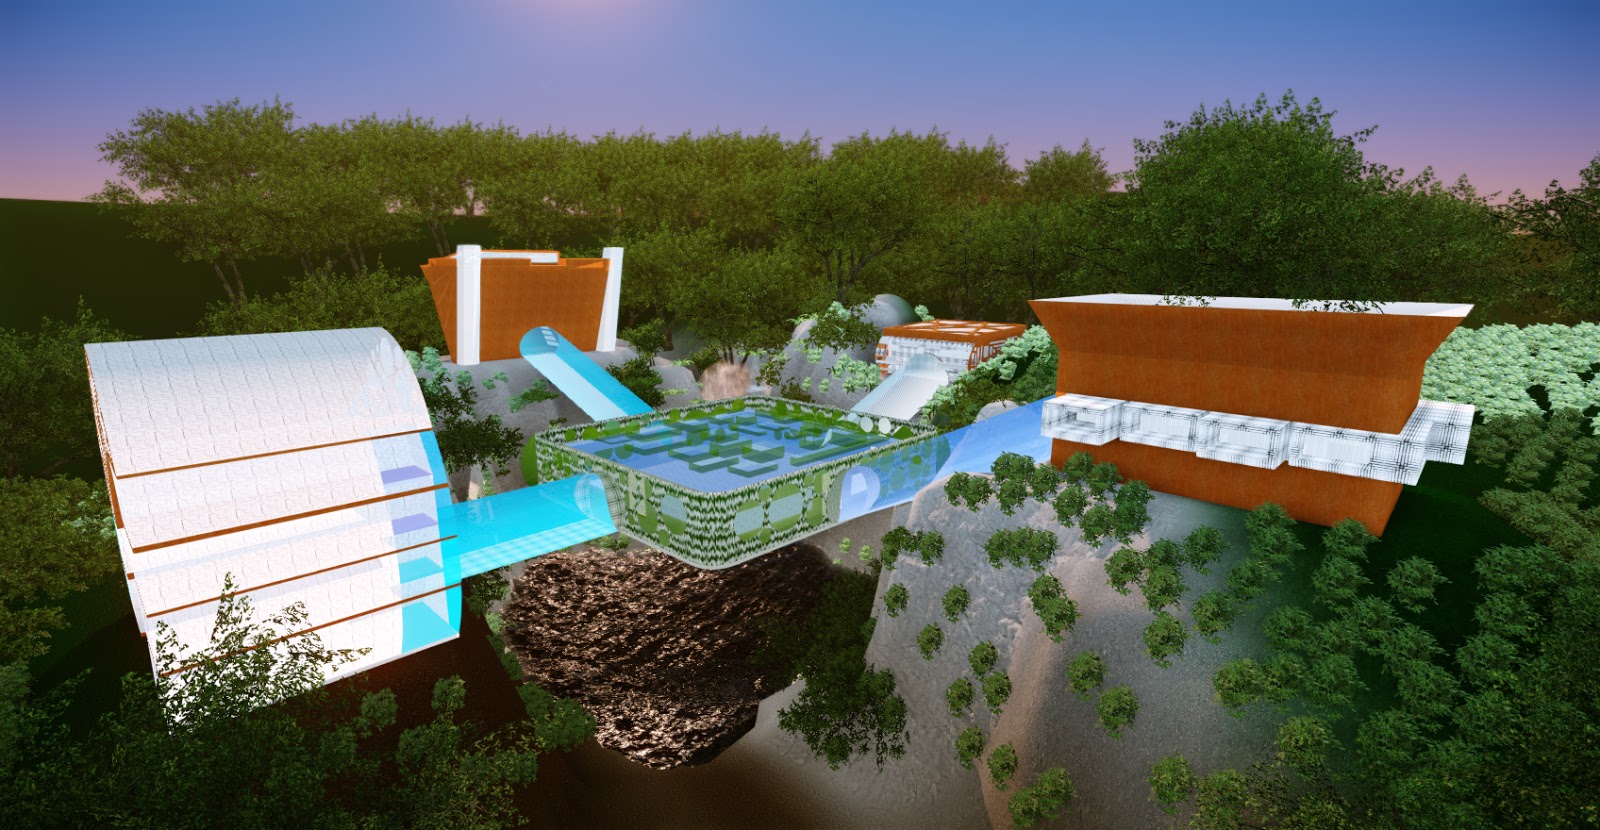
A distant view showing the relationship of the various zones.
A view through one of the glass tunnels revealing other zones in the distance.
Sketchup model
Another view showing the dense vegetation and various zones as well as the folly.

All in all this experiment and subject in general has been an outstanding experience and I have really developed my skills when it comes to the design process. I have learned new skills throughout this subject which I will apply to all my future experiments throughout my studies but also throughout my future career.

Dropbox link to my CryEngine files: https://www.dropbox.com/sh/c7m8l875etfzdge/syxjI-5UVn
Google SketchUp files: http://sketchup.google.com/3dwarehouse/details?mid=4dbf2e7cb491536cf3e0b3de91eba079

Fellow students reviews


Sunday 23 June 2013

Inspiration

As I was getting inspired throughout the late hours of Sunday, I bumped into this interesting looking bridge located in Venice which was designed by Santiago Calatrava. Really inspiring.


Reference: Grand Canal Birdge, designed by Santiago Calatrava, Venice

Thursday 20 June 2013

Teachers Zone

For this particular zone I wanted to experiment with an idea that I had personally developed throughout the first semester of this course. I created a simple building consisting of the individual spaces outlined in the teachers zone previously in this experiment and created a skin around the structure to be able to create extraction points of hot air all around the main structure thus maintaining a cool temperature throughout the building. Such idea was inspired by the ever growing demand for sustainable buildings.

I believe that such design would almost extinguish the need for mechanical ventilation thus resulting in less energy consumption rates. The screenshots of the building can be viewed below.

A view from inside of the building showing the roof and skylights.
A distant view of the building showing the skin surrounding the core of the building.
A framed view looking out to the skin and environment.
A top view showing the profile of the roof.
A view of the model created using Sketchup.
The next and final phase of this experiment will be to link all these zones together using bridges and elevators and to also design an Architectural Folly inspired by my concept to achieve the design brief of this experiment.

Wednesday 19 June 2013

Students Zone

For this particular zone I wanted to experiment with another sustainable approach which is to allow the structure to maximise its capabilities in collecting rainwater and store it. A traditional pitched roof tends to slope away from the centre of the building to allow the rainwater to run off. However, I have reversed this concept by allowing the roof planes to slope inwards to the centre of the building where I have placed a rainwater tank to gather the rainwater which also acts as the core of the building.

In doing so, I was able to once again successfully execute a sustainable concept and implement it into my design. Screenshots of the building in its context can be viewed below.

A view from inside of the building showing the extruded windows.
Another internal view showing the passage ways between the areas within the building and also the rainwater tank that vertically flows down the centre of the building.
A distant view showing the building (position of building not final).
This view shows the roof of the building and the slope of the roof planes and also the rainwater tank.
Another view showing the roof and the rainwater tank.
A distant view of the building (position of building not final).
The building created using Google Sketchup.
My approach thus far for this experiment has been mainly focused on implementing sustainable design solutions to each zone of my bridge to successfully achieve my main concept that was established earlier in this experiment.

Library

The next zone that I wanted to detail was the library. My approach to this particular zone was inspired by the concept of recycling which in this case is the large roof of the building that is made up of solar panels to gather energy from the sun. In doing so, I was able to achieve a building that would sustain itself in terms of the energy it uses thus accomplishing the concept of recycling in the design of my building. I also created two different spaces of multiple levels on each side of the building linked together by a curved stairway that would entice the people walking on it to absorb the surrounding nature that is framed through the circular fixed windows throughout the length of the stairway.

The screenshots of the library can be viewed below.

The model inside of Google Sketchup.
A view looking down on the stairs to the lower section of the library.
A view from the waterfall ( the position of the building is not final).
A distant view showing the model in its environment (position of building not final).
Inside of the linking bridge looking up at the stairs.
The other zones will be detailed in the upcoming days.

Monday 17 June 2013

Lecture Theatre

The first zone that I wanted to detail was the lecture theatre. My main focus and inspiration when detailing this zone was to develop a passive and sustainable design using recycled materials such as timber. I wanted to create a design that would be suited to its environment and would be able to be as organic as possible in terms of how well it works with its surrounding and in this case accounting for natural ventilation to avoid using mechanical ventilation.

To achieve this idea, I was inspired by the gills found on a fish and implemented them to my building to create the movement of air throughout the lecture theatre. I also added skylights and fixed windows to allow for natural lighting to enter the building. Being an Architectural school, I wanted to explore a different approach to what a lecture theatre should look like and drifted away from the average dull lecture theatre to create a different teaching atmosphere. To highlight the idea of sustainability to the students in my school, I designed the lecture theatre so that its main frame is made up of recycled compacted timber as a reminder for the students that sustainability is essential in today's Architectural approach to design.

To further expand on the opportunities for a futuristic teaching atmosphere, I added a roof top garden that can be accessed using two glass framed elevators. The lecturer can offer their lecture on the roof top garden to allow the students to be inspired by the surrounding environment. 

Screenshots of my detailed lecture theatre can be viewed below. 

Showing the roof top garden that the students and lecturer can access.
A distant view of the lecture theatre resting on the face of the cliff as its main support.
A higher distant view conveying the scale of the lecture theatre.
A view from the water.
Internal view of the theatre showing the seating and lighting elements.
An interior view showing the gills and the elevator that would be used to access the roof top garden.
Skylights
A view from inside of the glass elevator
This view shows the gills of the building to allow for natural air into the building and also shows the lighting strips implemented into the floor to also allow for light to enter the building and gain a view to the water from the top.
I believe that I have achieved the passive and sustainable design that I was after for this lecture theatre and hope that I can fulfil my other design ideas in the other zones of this school in the upcoming days.

Thursday 13 June 2013

Detailing The Environment

Throughout the upcoming weeks I will be detailing my project as part of my final submission for this experiment. I have also decided to detail my environment by adding more textures, vegetation and objects to it. In doing so, I will be able to maintain a consistent and detailed approach to all areas of this experiment. I have taken a few screenshots of my detailed environment which can be viewed below.


The next phase of my project would be to detail each individual area that I have already established. For example, I will develop the area that I have allocated for the students by incorporating the smaller individual spaces such as studios, computer labs and workshops.

As a whole, I intend on adding as much detail as possible to the individual spaces within my bridge to make it as realistic as possible which will then be linked together by various elevators.